
You are aging right now. The question is how fast.
Not in the poetic, philosophical sense — in the measurable, testable, reversible sense. Your DNA methylation patterns are shifting as you read this. The speed at which they shift is now something you can track, modify, and reduce across a structured 90-day window. The science for this has existed for years. The consumer tools to run it yourself arrived in the last two.
This post is the instrument. If you want the story behind why I ran this protocol — the moment I looked at my first biological age result and felt the kind of cold clarity that only data can produce — that narrative is on Medium. This post is the opposite of narrative. This is the exact framework, the tools, the tracking template, and the decision logic I used to move my DunedinPACE score by 0.15 points in 90 days.
Before working through the methylation framework below, it is worth understanding the broader logic of how to run these sprints. Our post on the three-question framework for high-stakes decisions covers the underlying architecture of structured self-experimentation — the same discipline that makes a 90-day protocol attributable rather than anecdotal.
This post is built in eleven sections. The first three set up the measurement infrastructure. The next four cover the protocol itself — interventions, decision logic, and mid-protocol checkpoints. The final four cover what most longevity content skips entirely: how to read your results at day 90, the common mistakes that destroy protocol integrity, the reading list that earns the framework its authority, and an FAQ for the questions that keep coming back.
1. Why Run a 90-Day Protocol Right Now?
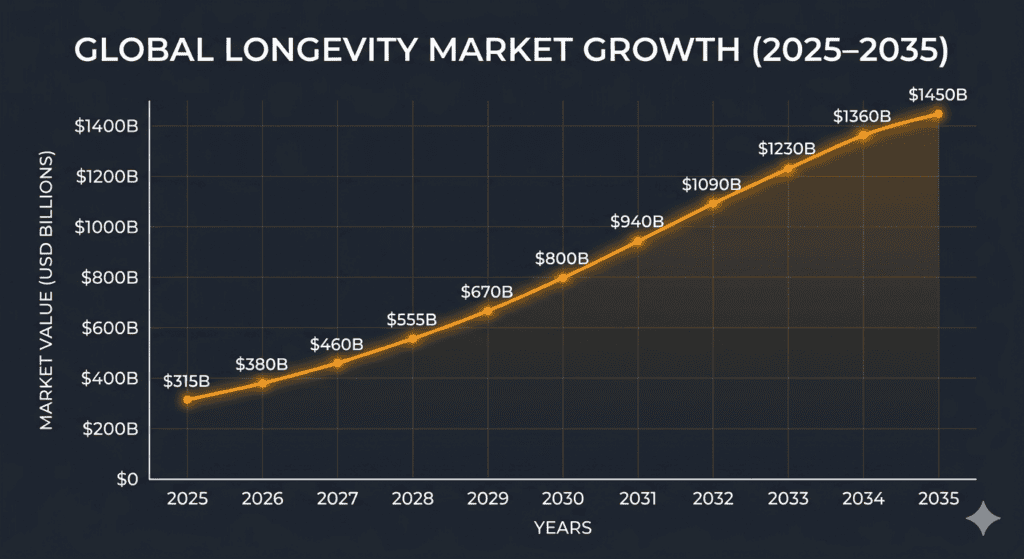
The longevity market sat at roughly $27.61 billion in 2025 and is projected to reach $67.03 billion by 2035 at a 9.41% CAGR. That growth is not being driven by clinics or pharmaceutical companies. It is being driven by individual consumers — who now represent the largest end-user segment of the market at over 35% — because the tools have finally become accessible enough to justify acting on the science.
Five years ago, methylation testing was a research-grade procedure costing thousands of dollars and requiring institutional access. Today, consumer-grade kits with clinically validated algorithms cost between $200 and $500. That price point makes a structured, data-driven self-experiment economically rational for the first time in history.
The sprint is 90 days because that window is the shortest interval in which methylation drift produces a reliably measurable signal. Anything shorter is biological noise. Anything longer compresses the feedback loop too much for effective course correction. The 90-day window is not arbitrary — it is the minimum viable experiment length for epigenetic self-experimentation.
Most people who run a well-structured 90-day protocol see meaningful movement on at least two of the four standard clocks. The framework below is designed to make that movement visible, attributable, and — critically — repeatable.
The single biggest mistake in longevity self-experimentation is treating biological age as a fixed number rather than a moving variable you can actively influence. This framework corrects that.
2. The Four Methylation Clocks: What Each One Actually Measures
Before you choose a test, understand what you are buying. The longevity testing market sells four distinct epigenetic clocks under the same “biological age” umbrella — and they measure fundamentally different things. Choosing the wrong clock to optimise for is one of the most common and expensive errors in consumer-grade self-experimentation.
| Clock | What It Measures | Best For |
|---|---|---|
| Horvath Clock | The original multi-tissue epigenetic age estimator. A snapshot of cumulative cellular wear across multiple tissue types. | Establishing a single baseline biological age number to anchor the experiment. |
| Hannum Clock | Blood-specific biological age. Trained exclusively on whole-blood methylation patterns. | Cross-referencing the Horvath result for blood-based protocols. |
| GrimAge | Mortality and morbidity risk based on plasma protein methylation surrogates. Predicts disease trajectory, not just age. | Identifying disease-trajectory risk before symptoms appear. The most clinically serious of the four clocks. |
| DunedinPACE | The velocity of aging — how fast you are accumulating biological age per calendar year right now. | Tracking change over a 90-day protocol. This is the number that matters most for self-experimentation. |
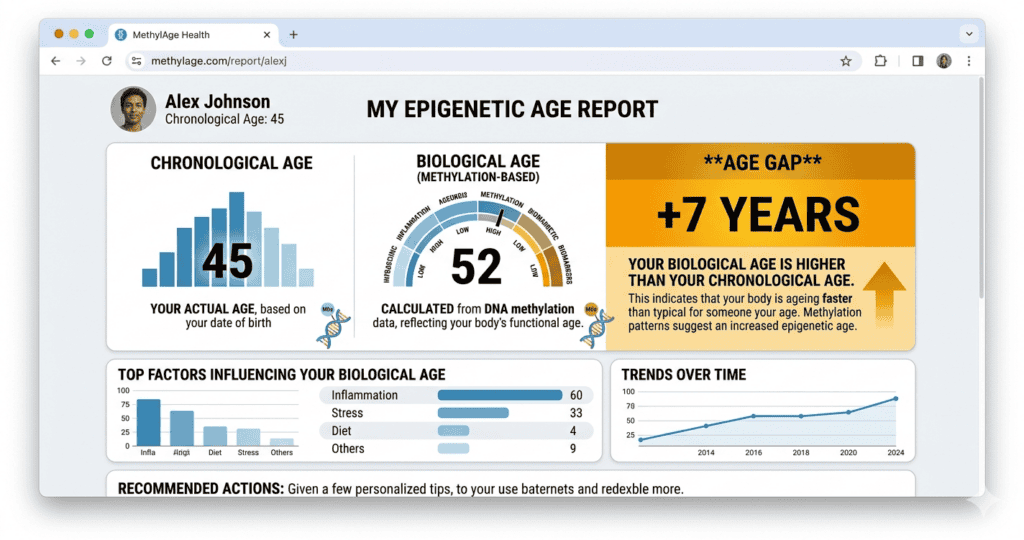
The distinction between the first three clocks — which produce a static age estimate — and DunedinPACE, which produces a rate, is the most important concept in this entire framework. A static biological age number can move slightly over 90 days, but the signal is small relative to the noise. The pace of aging — your DunedinPACE score — moves more decisively because it captures velocity rather than position.
This is analogous to the difference between knowing your current bank balance (static age) versus knowing how fast money is leaving your account each month (DunedinPACE). The balance tells you where you are. The velocity tells you where you are going — and whether the current trajectory needs to change.
Every credible self-experimentation protocol prioritises DunedinPACE as the primary outcome metric. When you select a test, prioritise kits that report DunedinPACE. The two recommended below both do.
3. Establishing the Baseline: What to Measure Before Day Zero
A protocol without a baseline is just a wellness hobby.
To track epigenetic age and the pace of aging, you must measure your DNA methylation markers before starting the 90-day clock. Without two data points — day zero and day ninety — there is nothing to compare, and the entire protocol collapses into anecdote. This is the most important logistical decision in the entire framework: order your test before you change anything.
The Two Recommended Methylation Kits

You need consumer testing kits that specifically measure the DunedinPACE algorithm alongside standard biological age clocks. These two kits provide the most actionable, clinically validated baseline data for this framework:
- TruDiagnostic TruAge: The gold standard for self-experimenters. It offers the most comprehensive DunedinPACE report available to consumers, alongside the static Horvath and Hannum clocks for cross-reference. Currently the most-used kit in the consumer self-experimentation community, with a robust data library for contextual benchmarking.
- Elysium Index: A more accessible alternative that uses a deeply researched proprietary biological age clock to track longitudinal change. Slightly less comprehensive than TruDiagnostic, but with a significantly more user-friendly results interface — the better entry point for first-time testers.
The Supporting Wearable Stack
Methylation tests give you the bookends. Wearables give you the daily signal that lets you correlate intervention to outcome in real time. The stack does not need to be exhaustive. Three instruments are sufficient — and one is enough if budget is the constraint.
- Sleep architecture tracking — Oura Ring or Whoop: Both deliver clinically respectable deep-sleep and REM percentage data. The Oura Ring 4 is the cleaner consumer device; Whoop is the better choice if HRV variability is a primary metric for your protocol.
- Continuous glucose monitoring — Levels Health or Lingo by Abbott: A two-week CGM cycle in the first month exposes hidden carbohydrate spikes that fasting glucose measurements alone will consistently miss. This is the single most undervalued data source in consumer longevity protocols. Most people who run CGM for the first time are genuinely surprised by what they find.
- HRV monitoring — chest strap (e.g., Polar H10): If your wrist wearable is unreliable for HRV — and most are — a chest strap during morning readiness checks is the definitive measurement tool.
You do not need all three. Pick the one that targets your weakest known intervention area. If sleep is the variable you are least confident about, prioritise the ring. If metabolic flexibility is the open question, prioritise the CGM. Clarity on which single lever is weakest is itself a valuable output of the baseline phase.
Secure your baseline. Once the results land, the 90-day sprint begins.
4. The Instrument: The 90-Day Tracking Template
Most longevity protocols fail not because the interventions are wrong, but because the data is fragmented and invisible.
When sleep data lives in one app, CGM spikes in another, and your supplement stack in a physical notebook, correlation becomes structurally impossible. You cannot see what is working. You cannot see what is failing. You are running a 90-day experiment with no instrument panel. The cost of that fragmentation is not just inconvenience — it is the inability to make attributable decisions when the data stops moving.
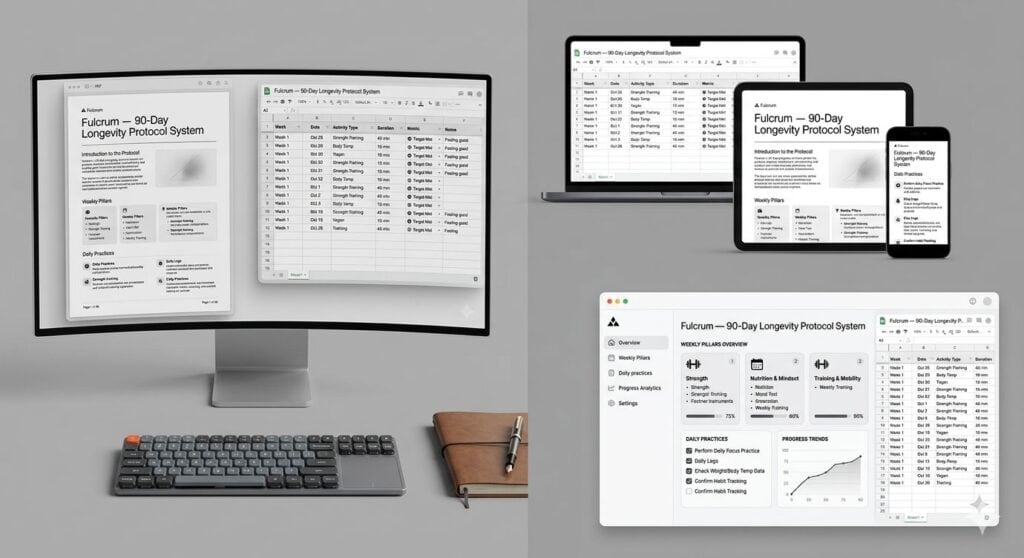
The unified Longevity Protocol Tracking Template solves this by collapsing every input into one sheet.
Template Architecture — Six Tabs
The template is built as a single Google Sheets workbook with six interconnected tabs, each designed to eliminate a specific failure mode:
- Instructions: The one-page setup guide — how to use the template, how the formulas connect, what to populate before Day 1.
- Daily Compliance Log: Binary tracking for the four foundational habits (bedtime, eating window, alcohol cut-off, training session). Pre-populated for 90 rows with automatic compliance percentage calculation.
- Weekly Biomarker Drift: Automated trend lines for HRV variance, resting heart rate, deep-sleep percentage, and fasting glucose. Pulls directly from the daily log — no manual charting required.
- Methylation Test Comparison: A side-by-side panel for your Day 0 and Day 90 results across all four clocks (Horvath, Hannum, GrimAge, DunedinPACE), with interpretation guidance for each movement threshold.
- DunedinPACE Projection Calculator: Estimates your pace-of-aging trajectory based on current biomarker inputs between methylation tests — so you are not flying blind for 90 days.
- Tier 1 Mastery Scorecard: The structured readiness assessment for advancing to Tier 2 interventions. Pass/fail criteria are hard-coded — there is no room for self-congratulatory rounding.
Get the Longevity Protocol System (Implementation Manual + Tracking Dashboard)
The templates give you the instrument. The Practical Implementation Guide gives you the operating manual — full intervention specifications for sleep, nutrition, and training with research citations; week-by-week milestone checklists; mid-protocol checkpoint protocols at Day 30 and Day 60; the post-protocol analysis worksheet; and printable decision-tree posters for the wall above your desk. One-time purchase, immediate download, free updates for life.
The Larger System This Template Belongs To
The spreadsheet above is a domain-specific extraction from the Decision-Making Toolkit — the broader architecture I use for mapping life-scale pivots, evaluating risk, and building compounding daily systems. The same structured-experiment logic that underlies the longevity protocol underpins the toolkit’s approach to every high-stakes decision. If you want the full system rather than the longevity-only slice, the complete toolkit is available on Gumroad.
5. The Tier 1 Intervention Specifications
The free template tracks compliance against four foundational interventions. These specifications appear in the exact form I used in my own protocol. The paid implementation guide expands each one with research citations, troubleshooting logic, and weekly progressions. What follows is the executive summary — precise enough to execute, brief enough to read twice before Day 1.
Sleep Anchor: 22:30 Wind-Down (Non-Negotiable)
This is the single highest-leverage intervention in the protocol. The specification has four components: a fixed wind-down time of 22:30 with no exceptions for social events; a phone-out-of-bedroom rule enforced physically, not by willpower; a bedroom temperature target of 18°C / 65°F; and a no-alcohol-within-three-hours-of-sleep rule. The alcohol component alone increased my deep-sleep percentage by roughly 40% on tracked data — it is the most underrated single change in the entire framework, and the one most people resist most strongly.
Understanding why sleep architecture is the foundational lever — not just that it is — dramatically improves compliance. Our post on why your brain needs unstructured recovery time to function at its highest level covers the neuroscience behind why sleep quality drives every other downstream metric in this protocol. For the deeper clinical science, Why We Sleep by Matthew Walker — included in the reading list at section 10 — is required reading.
Eating Window: 10-Hour Compression
The metabolic flexibility lever. Compress your eating window to 10 hours, with the window closing at least three hours before sleep. Protein loading shifts toward the morning hours. Ultra-processed carbohydrates are eliminated entirely on weekdays. Weekend flexibility is built in deliberately — not as a reward, but as a compliance mechanism. Protocols that allow no flexibility have lower 90-day completion rates.
The 10-hour window is a deliberate compromise. The research literature shows diminishing returns past 10 hours of compression for most healthy adults, and the compliance cost rises sharply as the window narrows below 10 hours. Eight-hour windows are appropriate for more aggressive Tier 2 protocols, not Tier 1.
Training: Two Quality Sessions Per Week (The Floor, Not the Ceiling)
Two structured sessions per week is the minimum specification: one Zone 2 cardiovascular session of 45–60 minutes, and one resistance session focused on compound movements. The minimum is deliberately low. Compliance — not intensity — is what moves the methylation needle across a 90-day timeline. Protocols that specify five sessions per week typically see 40% dropout by Day 30.
If you currently train more than this minimum, do not reduce volume. The specification is a floor. The point of the floor is to make the protocol completable by people whose baseline training frequency is low, not to cap people who are already training effectively.
Cognitive Load: One Recovery Block Per Day
The least obvious of the four interventions — and consistently the one that produces the most surprise when people track its effects. Stress methylation patterns map closely to cognitive load patterns, and a single 20-minute block of true cognitive recovery per day measurably reduces stress-driven methylation drift across a 90-day window.
The specification is strict: no input, no decisions, no consumption. Walking without a podcast qualifies. Sitting in silence qualifies. Meditation qualifies. Scrolling does not qualify. Listening to a podcast does not qualify. The research on your brain’s default mode network — the system responsible for consolidation, repair, and creative synthesis — explains why unstructured downtime is not optional but structural. The brain has a recovery mode. Most people never activate it.
6. The Protocol Decision Tree: Branch Logic for When the Data Stalls
Collecting data is the easier half of a self-experiment. The harder half is knowing what to do when the data refuses to move in the direction you expect.
This framework uses a strict decision tree to govern those pivots. The principle beneath the tree is simple: you must demonstrate mastery of Tier 1 interventions before advancing to Tier 2. No exceptions, no shortcuts. Advancing to Tier 2 without Tier 1 mastery is the single most common cause of uninterpretable Day 90 results — because you cannot attribute change to any specific intervention when you are running six of them simultaneously.
Tier 1 covers the foundational behavioural layer — sleep hygiene, circadian alignment, basic metabolic control. Tier 2 layers on advanced nutraceuticals, hypoxic training, or aggressive fasting protocols, but only after Tier 1 metrics have stabilised for a minimum of 21 consecutive days.
For the deeper work on building the discipline that Tier 1 demands — particularly the daily habit architecture that prevents the 40% compliance drop that kills most protocols by Day 30 — the post on how to predict and pre-empt protocol failure before it happens is the most directly applicable framework in the Fulcrum archive.
| Scenario | Trigger Metric | Required Action |
|---|---|---|
| Metabolic Non-Response | Fasting glucose remains above 90 mg/dL after 30 days despite dietary compliance. | Audit hidden carbohydrates via CGM; implement a 16-hour fasting window for 14 days; test insulin sensitivity (HOMA-IR). |
| Recovery Plateau | Deep-sleep drops below 15% for 4 consecutive nights. | Strip all Tier 2 supplements; enforce strict temperature control (18°C / 65°F); initiate a 48-hour caffeine detox. |
| HRV Compression | Morning HRV drops 20% below the rolling 14-day baseline. | Cut training volume by 40% for one week; audit alcohol consumption and late eating window; check for subclinical infection. |
| Compliance Collapse | Daily compliance drops below 70% across any 7-day window. | Stop adding interventions immediately. Audit the four Tier 1 anchors and rebuild from the weakest link. Do not continue layering. |
| Tier 1 Mastery Confirmed | 90% compliance on daily logs and stabilised baseline metrics for 21 consecutive days. | Proceed to Tier 2 layering. Introduce targeted methylation support or advanced protocols sequentially — never simultaneously. |
The final row matters most. The temptation when Tier 1 starts producing results is to accelerate by layering everything at once. Resist it. Sequential introduction is the only methodology that allows you to attribute change to a specific intervention rather than to an undifferentiated compound of unknowns. Patience in Tier 1 is what makes Tier 2 legible.
7. Mid-Protocol Checkpoints: Day 30 and Day 60
The 90-day window has two structural checkpoints, deliberately placed at 30 and 60 days. Both are non-negotiable. Skipping either one converts the protocol from a tracked experiment into a long stretch of undirected behaviour with a test at the end. The checkpoints are where the intelligence lives.
The Day 30 Checkpoint: Compliance Integrity Audit
At Day 30, you are not yet looking for biological age movement — that signal is not reliably detectable on a static clock at this timescale. You are looking for compliance integrity. Three diagnostic questions govern this checkpoint.
First: has daily compliance averaged 80% or higher across all four Tier 1 anchors? If not, the protocol does not continue as designed. You reset to Day 1 with a smaller, more realistic intervention set. This is not failure — it is data. Second: has fasting glucose shown a downward trend across the rolling 7-day average? If not, audit hidden carbohydrates and consider a 14-day CGM cycle before proceeding. Third: has deep-sleep percentage stabilised above 15% on tracked nights? If not, the temperature, alcohol, or phone variables are likely the culprits — audit each in isolation before assuming the protocol design is wrong.
The Day 60 Checkpoint: Biomarker Drift Assessment
At Day 60, you are looking for biomarker drift — the first quantitative evidence that the protocol is moving the underlying physiology in the right direction. By this point, fasting glucose should be 5–10 mg/dL below your Day 0 baseline if metabolic flexibility is genuinely improving. Resting heart rate should have dropped 3–6 bpm if cardiovascular conditioning is responding. HRV should show a clear upward drift on the rolling 14-day average.
If none of these movements are visible by Day 60, the protocol design needs structural revision before Day 90 — not optimistic continuation. The paid implementation guide includes a structured Day 60 review worksheet that walks through diagnostic logic for each potential failure mode. It is the document that prevents people from arriving at Day 90 with a result they cannot interpret.
8. Common Mistakes That Break the Protocol
After watching dozens of self-experimenters run versions of this framework, six failure modes appear with disproportionate frequency. Each one is preventable. Knowing them in advance is worth more than knowing them after the fact.
Mistake one: retesting too often. Methylation drift carries significant biological noise at short timescales. Retesting more often than every 6–12 months — outside the structured Day 0 / Day 90 bookends — gives you signal lost in static. The temptation to test at Day 30 or Day 45 is understandable. Resist it. The data will mislead you in proportion to how early you collect it.
Mistake two: layering Tier 2 interventions during Tier 1. The single most common protocol failure mode, and the one with the most seductive logic attached to it. The result is always the same: you cannot attribute any subsequent change to either tier, and the Day 90 result becomes uninterpretable.
Mistake three: chasing wearable noise. A single bad sleep night does not require intervention. A single low HRV reading does not require intervention. The protocol responds to trends — 7-day rolling averages and 14-day baselines — not individual data points. Reacting to single readings is the fastest way to spiral the entire system into reactive chaos. This mistake shares the same psychological root as the analysis paralysis trap — intelligent people overthinking good data into bad decisions.
Mistake four: changing the eating window during the 90 days. If you start on a 10-hour window, stay on a 10-hour window for the full 90 days. Modifying the compression rate mid-protocol introduces a confound that will permanently obscure the post-protocol analysis. Consistency is the experiment design.
Mistake five: skipping the Day 30 checkpoint. Compliance integrity at Day 30 is the single variable that most strongly predicts whether Day 90 will produce attributable movement. People who skip the Day 30 checkpoint almost always arrive at Day 90 with a result they cannot explain, because the compliance infrastructure was never verified.
Mistake six: optimising for the test rather than the system. The methylation result at Day 90 is feedback, not the goal. The goal is the underlying system stability — the behavioural infrastructure that will continue producing biological age improvements after the protocol window closes. People who optimise for the test invariably regress within 30 days of the protocol ending. People who optimise for the system retain the gains. This distinction is the same one that separates a sustainable 90-day routine from a performance put on for 90 days.
Get the Next Protocol the Moment It Is Tested
Self-experimentation does not end at day ninety. It restarts.
When this 90-day sprint concludes, the data dictates the next frontier — whether that is sleep architecture refinement, metabolic flexibility extension, or a controlled introduction of Tier 2 compounds. Each next protocol is documented and released the moment it passes the same test bar this one did: a Day 90 result that is attributable, not anecdotal.
Enter your email below to receive the raw data, the post-mortem analysis, and the next protocol template the moment it has been tested.
Get the next protocol the moment it’s ready — join the Fulcrum newsletter here.
9. Reading Your Day 90 Results
The Day 90 methylation test arrives in your inbox between 10 and 21 days after you mail the kit. Most people read the result wrong on the first pass — either by fixating on the wrong metric or by misinterpreting the magnitude of movement. There are three layers to interpret, in strict order.
Layer One: DunedinPACE Movement (The Headline Number)
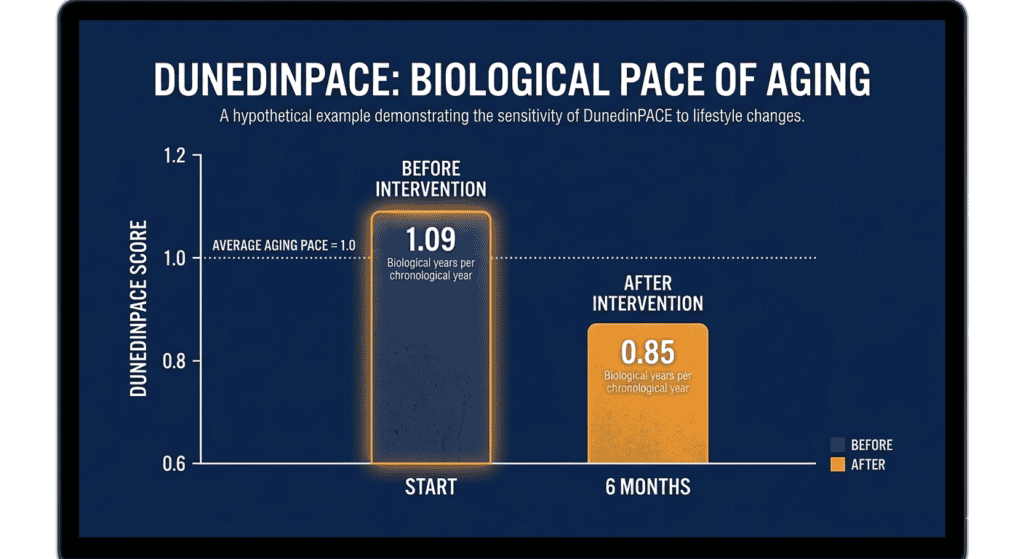
This is the primary outcome metric. The interpretation framework is straightforward: a score below 1.0 means you are aging slower than calendar time. A score above 1.0 means you are aging faster than calendar time. Movement of 0.05 or more on the DunedinPACE metric over 90 days is meaningful. Movement of 0.10 or more is exceptional. Movement of 0.15 or more places you in the top tier of documented consumer self-experimentation outcomes.
A Day 90 result of 0.92 from a Day 0 baseline of 1.07 — the movement reported in the companion essay — represents a 0.15 shift, well into the exceptional range. Most well-run 90-day Tier 1 protocols produce shifts of 0.06–0.10. Expectations calibrated to that range are realistic; expectations calibrated to dramatic overnight reversal are not.
Layer Two: Static Clock Alignment
Cross-reference your Horvath, Hannum, and GrimAge results against the DunedinPACE movement. If DunedinPACE moved meaningfully but the static clocks did not, this is expected — DunedinPACE responds first precisely because it measures velocity rather than position. If the static clocks also moved, you are seeing the leading edge of a more durable biological shift.
If DunedinPACE moved but no static clock moved at all, run a second methylation test in three months before concluding anything. The directional signal is present but the durability is not yet confirmed by the data.
Layer Three: Biomarker Coherence
Your wearable and CGM data should tell the same story as the methylation result. If the methylation result shows meaningful improvement but your sleep architecture, HRV trend, and fasting glucose data did not improve across the 90 days, something is wrong with one of the data sources. The most common cause is inconsistent sample timing. Re-run the test under identical conditions before drawing conclusions from the discrepancy.
The full Day 90 analysis worksheet — including a structured three-layer comparison framework — is included in the paid implementation guide.
10. The Annotated Reading List
Do not blindly follow templates. Understand the science underpinning the framework well enough to modify it intelligently when your data requires it. The list below is the reading that earns the framework its authority — not citations for decoration, but the actual texts that shaped the protocol design.
Foundational Research Papers
- The DunedinPACE Algorithm (Belsky et al., eLife, 2022): The cornerstone paper detailing how the pace of aging can be measured via blood DNA methylation. This is the paper that moved the field past static biological age clocks into real-time velocity tracking — the conceptual shift on which this entire protocol rests.
- DNA Methylation Age of Human Tissues and Cell Types (Horvath, Genome Biology, 2013): The original breakthrough research establishing the first highly accurate epigenetic clock across multiple tissues. Every subsequent methylation product is built on top of this work.
- GrimAge Outperforms Other Epigenetic Age Estimators (Lu et al., Aging, 2019): The paper that established mortality and morbidity risk as a separable axis from chronological biological age.
Required Books
-
- Outlive: The Science and Art of Longevity by Peter Attia: The most clinically rigorous popular book on longevity currently in print. Read this before you start the protocol — it gives you the medical framework that makes the methylation data interpretable. The chapters on Zone 2 training and metabolic health are directly applicable to Tier 1.
-
- Lifespan: Why We Age — and Why We Don’t Have To by David Sinclair: The essential primer on the Information Theory of Aging and the role of sirtuins in cellular repair. Read this second — it explains the mechanism that methylation testing is measuring.
-
- Why We Sleep by Matthew Walker: The book that converts most readers from “sleep is important” to “sleep is the foundational lever of everything.” Reading it is what caused me to make the sleep anchor the non-negotiable first intervention in this framework.
-
- Ageless: The New Science of Getting Older Without Getting Old by Andrew Steele: A pragmatic, systems-level overview of the current state of biogerontology and the hallmarks of aging.
- Younger You by Dr. Kara Fitzgerald: The most practically focused book in the list — a clinical examination of how specific dietary and lifestyle interventions directly impact DNA methylation without pharmaceutical intervention.
If reading lists structured around foundational systems thinking are useful to you, the MBA-Alternative Reading Kit applies the same curatorial principle to decision quality, business strategy, and capital allocation — built on the premise that the right ten books outperform the wrong hundred.
11. Frequently Asked Questions
How accurate are consumer methylation tests? Consumer-grade DunedinPACE testing currently sits at roughly 95% concordance with research-grade testing on the same samples. The static clocks (Horvath, Hannum, GrimAge) sit slightly lower at 88–93% concordance, but are sufficient for tracking directional change across a 90-day window.
Can I run this protocol if I am over 50? Yes — the protocol is age-agnostic in its structure. Older starting ages typically produce larger absolute shifts because the methylation slope is steeper and the intervention effect is proportionally larger.
Do I need all three wearables? No. If you must choose only one, prioritise sleep architecture tracking — it covers the highest-leverage Tier 1 anchor and provides the most interpretable daily signal. The CGM is a 14-day diagnostic, not a 90-day requirement.
What if my Day 0 methylation result shows my biological age is already younger than my calendar age? The protocol still applies. DunedinPACE is independent of static biological age — you can be biologically younger than your calendar age and simultaneously aging faster than calendar time. The pace is what matters across the 90-day window.
Can I take supplements during the protocol? You can continue any supplements you were taking before Day 0. Do not introduce new supplements during the 90 days — introducing new variables mid-protocol destroys attribution.
How much does the full protocol cost, end to end? The methylation tests are $200–$500 each, so $400–$1000 across both bookends. A wearable is $200–$400 if you do not already own one. The free template costs nothing. The paid implementation guide is a one-time purchase. Total minimum spend if you own a wearable: $400. Total typical spend with one new wearable: $700–$1000.
Should I tell my doctor I am running this protocol? If you have any pre-existing condition or take any medication, yes — unconditionally. The protocol is built around behavioural interventions that are individually unremarkable, but the combination can interact with thyroid, blood-sugar, and cardiovascular medications in ways your prescriber needs to be aware of.
Where to Go From Here
The companion narrative — the personal story of what it felt like to see a 0.15 DunedinPACE shift on a Day 90 result — is on Medium. The expanded systems toolkit this framework was extracted from is on Gumroad as the Decision-Making Toolkit. The reading-list logic that powers section 10 extends into the MBA-Alternative Reading Kit — the same curatorial principle applied to decision quality and strategy. The full product hub is at fulcrum.blog/products.
If you find yourself hitting the cognitive load limits of self-experimentation — the burnout of tracking too much, the decision fatigue of interpreting signals — the post on why relentless productivity is making you a worse thinker is the most directly relevant corrective in the Fulcrum archive.
If this work has been useful, you can support the project directly on Ko-Fi. Every contribution underwrites the next protocol.
This framework underpins every longevity post on Fulcrum. Updates to the template, the reading list, and the protocol itself are released to the email list before they appear publicly. The opt-in form is above in section 8.
Disclaimer: This article is for informational purposes only and does not constitute medical advice. The results described reflect one individual’s personal experience and may not be typical. Consult a qualified healthcare professional before making any changes to your diet, sleep, or health protocol. The author has no financial relationship with any testing company mentioned.